The weather is starting to get a little cooler. The summer plants are starting to go dormant. It’s time to start planting bulbs!
Every year I start off with grand ideas of what I want to do in the gardens. Every year I make garden plans and layouts. Every year I buy bulbs, seeds, and plants with precise places for them. And then…. I get all of them and it is so overwhelming that I throw out the plans. I throw out the ideas. And I start playing in the dirt and I’m so very happy. It’s worked so far.
Bulbs… and more bulbs…
This spring, I lifted all of my hyacinth and a lot of my tulips. The hyacinth because they were in a bed that is heavy clay and get a lot of water. This causes the bulbs to rot during the summer (learned that the hard way). The tulips came up in that garden and in the new OZ Garden as part of its renovation.
At the same time I ordered my bulbs. Not that I needed any additional bulbs, but they sure are pretty so how could I not buy more.
Plans versus Reality
When I purchase plants, seeds, or bulbs, I look up some basic information: sun requirements; bloom time; height and spread; and color. I make plans on where they should go. I update the garden plans and create spreadsheets and wait for them to be delivered.
Typically, once I get them, all of that planning goes out the door and I just have fun playing in the dirt. My “normal” way of planting bulbs is to dig a large area at the correct depth, place the bulbs, and then put the dirt back on top. Oh. And add some type of bulb fertilizer.
This year, I got a Newsletter from RoozenGaarde about the way they plant tulip bulbs. They have beautiful gardens. Their September 2020 Tulips Tidbits had some great information on their planning and planting stage. I decided I will try to use part of what they suggest and I will layout the bulbs in the garden prior to planting.
This year I’m going to compromise. I wanted an area of Anemone. I dug up a triangular area about 12″ per-side at 3″ depth. Sprinkled the anemone corms and put the dirt back. Fingers-crossed.
Planting Hyacinth Bulbs
I pulled up 160 hyacinth bulbs. That was one kind of bulb I didn’t order more of. Sort of figured I might have just the right amount. They are all mixed together so I have no idea what colors are going to come up.
I kept them in the basement in a cool place all summer long. When I brought them out, they looked great.
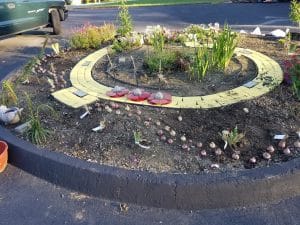
I brought them all up to the front OZ Garden and placed them where I thought they would look good. It helped me visualize them and give them enough space and made sure that I had some left for one of the gardens in the backyard. It was fairly easy to dig individual holes – that garden has great soil.
Since I started the processes in the early evening and ran out of light, I just left spaces for where other bulbs will go later and I’ll run through the same process.

Still being delivered…
The hyacinth are part of the selection of bulbs I pulled up this past spring. I still have a lot of bulbs I’m waiting to be delivered. Here’s what I’m expecting to be delivered in the next couple of weeks:
Type | Qty |
|---|---|
Allium | 160 |
Camassa | 100 |
Corrina | 100 |
Triplet Lily | 40 |
Tritelia | 25 |
Crocus | 160 |
Daffodils on order | 20 |
Ipheion | 125 |
Dutch Iris | 70 |
Dwarf Iris | 100 |
Liatris | 100 |
Muscari | 75 |
Muscari, uncommon varieties Comosum & Plumosum | 100 |
Pink Scilia | 50 |
Tulips on order | 226 |
Anemone | 85 |
Trumpet Lily | 5 |
The nice thing about bulbs is that you can plant them anytime in the fall/winter as long as the ground hasn’t frozen. If you can dig a hole, you can plant a bulb.
Conclusion
Get out there in this beautiful and mild autumn and plant bulbs for a beautiful and colorful spring.